In our new tutorial series “Back to Basic” we want to show all newcomers how easy it is to earn money with VX|Cash.
For many webmasters, success with VX|Cash means their own live cam domain. We want to show you how easy it is with VX|Cash to transform your own domain to your live cam domain! This tutorial is also suitable for your own Lustagenten platform to host on your own domain.
And this is what you need:
- your own domain
- a modular campaign (VISIT-X or Lustagenten)
- the appropriate CNAME configuration
- an image for the header!
First you have to add your domain with VX-CASH.
You do this with “Campaign > Domain administration”. Here you can “Create a new domain” (please enter “http: //” not https://). Then go to “Products> VISIT-X> Whitelabel”. Here you can set a campaign name for the Cam Whitelabel and enable this with “Create campaign” to start with the configuration.
On the new “Configuration” page that will appear, you will find the item “Own Domains”. The domain previously created under “Campaign > Domain administration” can be selected here. Now you have VX | Cash prepared to assign the correct webmaster ID and campaign ID to your domain.
What still needs to be done is, you have to tell your domain provider that your domain is to point to our server, via CNAME entry. What is a CNAME? Learn more about this in the following Wikipedia article: http://en.wikipedia.org/wiki/Cname.
Now we will show you how to configure the settings for 5 different providers. In case you are using another domain provider: usually things are the same everywhere. Please contact your domain provider if you have any questions.
Important note #1::
www.ihreseite.com. 28800 IN CNAME cams20.net. < Please note that for various domain providers you don’t have to enter the period after cams20.net.> Please contact your domain provider if you have any questions.
Important note #2::
CNAME entries are only available on the sub-domain level, since there is no DNS entry given here. For a domain the name server of the provider is recorded at the respective registry (e.g. DENIC). These entries are generated via so-called NS records. So for every domain there is a DNS entry already. Since this entry can’t be deleted, it is not possible to use CNAME entries on domain level.
CNAME Entry VX|Cash for 1und1
Sign in: https://www.1und1.de/login, then click on “Domains“, and then “Domain Center“.
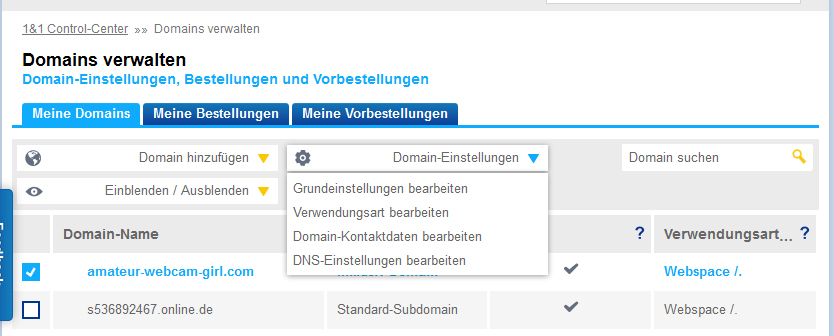
Highlight your domain (left), then click on “Domain-Einstellungen” (domain settings) and then > “DNS-Einstellungen bearbeiten” (edit DNS settings).
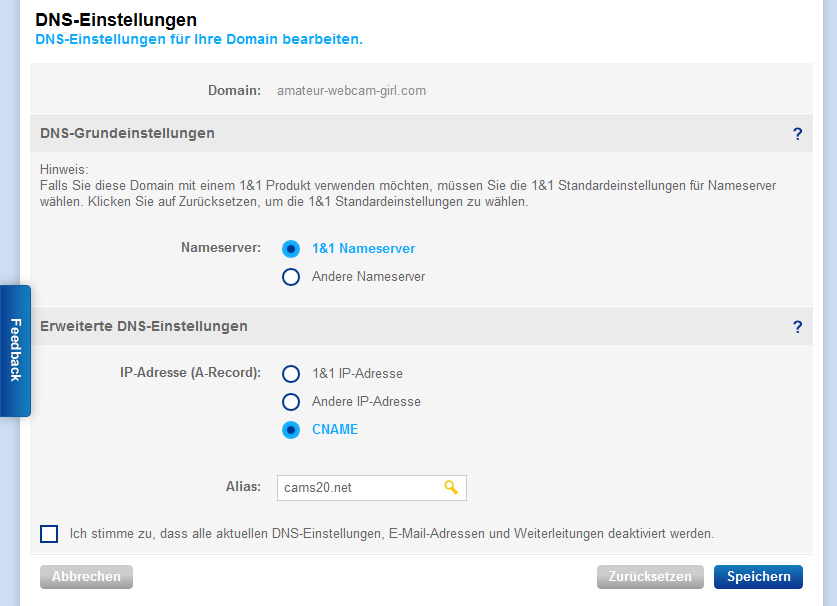
In the following screen, please configure as follows.
Note: For 1und1 CNAME settings / changes usually need a bit longer. 1und1 points out that it may take up to 72 hours until your CNAME entry has been accepted by all name servers.
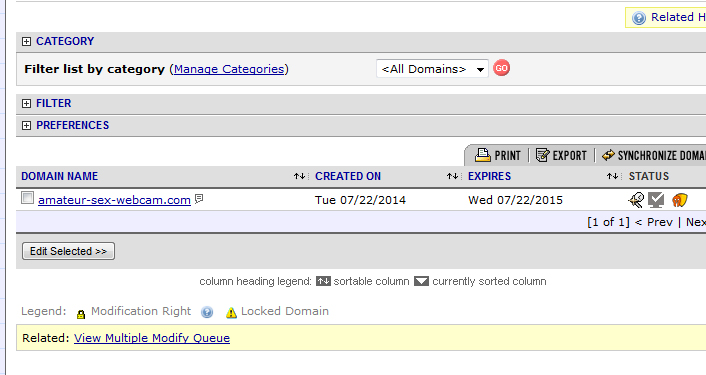
Once the entry has been accepted, your page should look like this, when accessed:

CNAME Entry for Namecheap
Log in and click on “Manage Domains“.

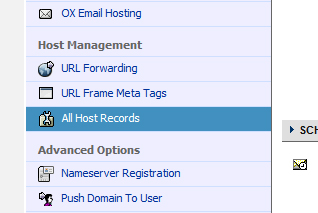
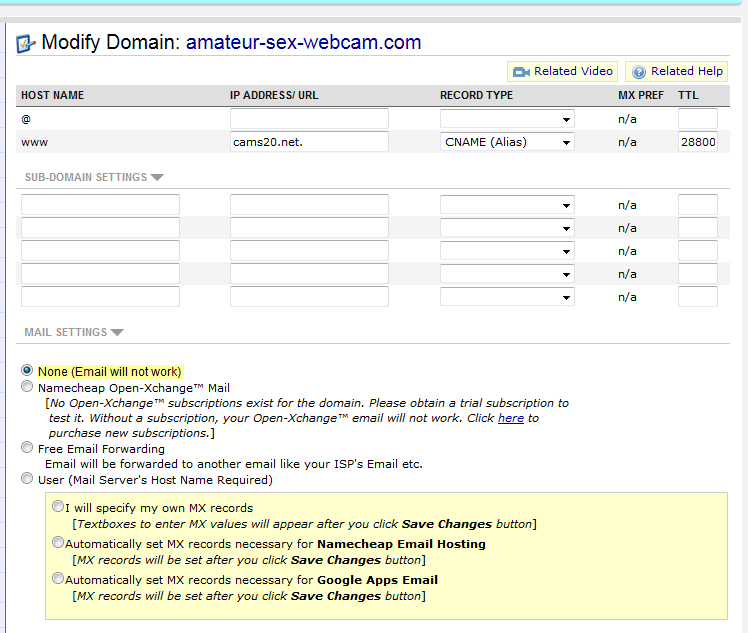
Then click on your domain. In our case this is “amateur sex webcam.com“. In the following screen, please click on “All Host Records“.
Configure the following setting::
CNAME Entry for United-Domains
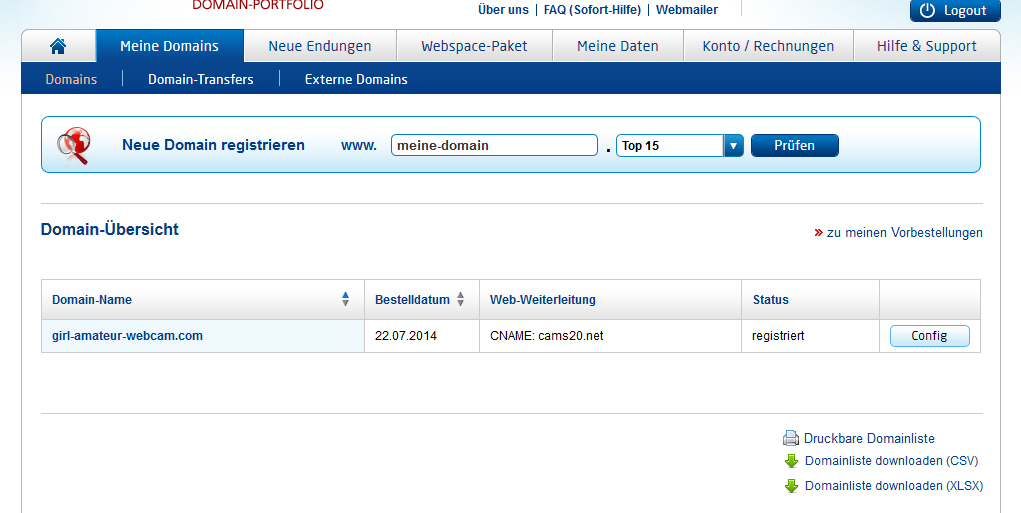
Log in. Then click on Config besides the name of the domain for which you want to set the CNAME entry. (In our case, this is girl-amateur-webcam.com.).
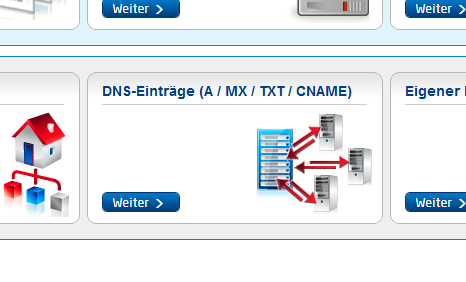
Click on “DNS Einträge (A / MX / TXT / CNAME)” (DNS entries) in the new screen.
Then click again on “A-Eintrag / CNAME-Eintrag definieren (define A entry / CNAME entry“.

Configure the following settings for your domain:
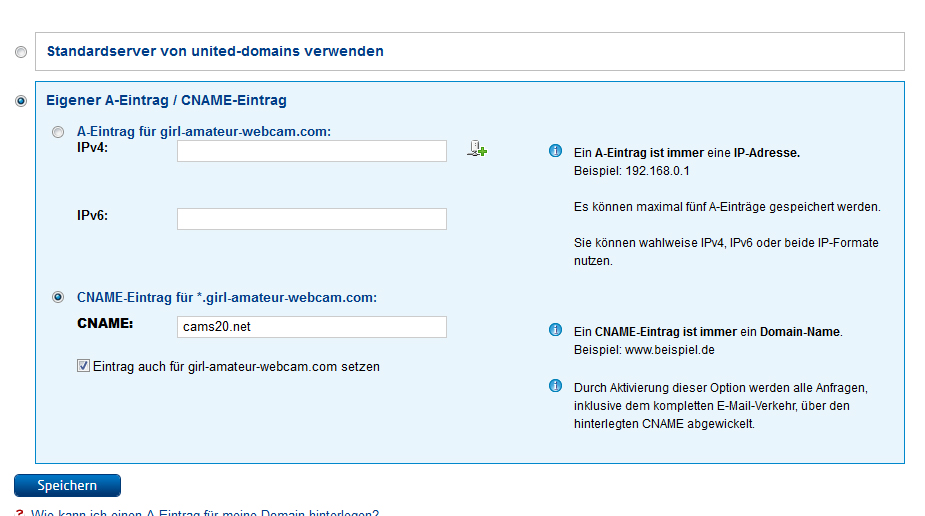
Note: Mark the checkbox “Eintrag auch für … setzen (set entry also for…)“
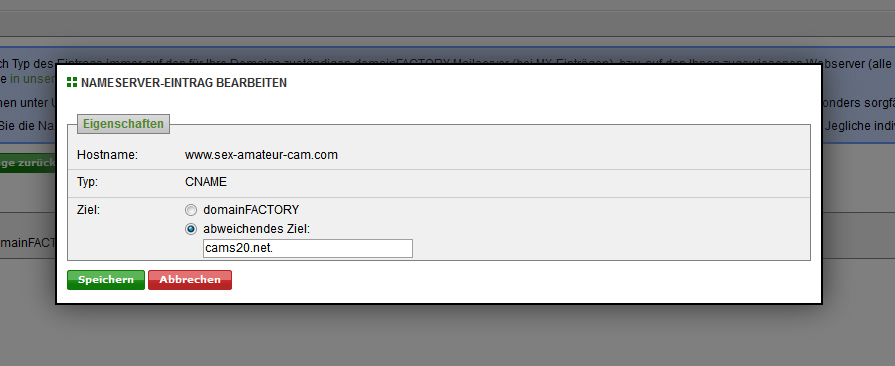
CNAME Entry for domainFactory
Log in and click on your domain (in our case, sex-amateur-cam.com).

Then click on “Für Profis” (for professionals) > Nameserver Einstellungen (name server settings).
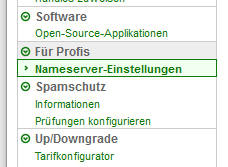
Configure the following settings for your domain:
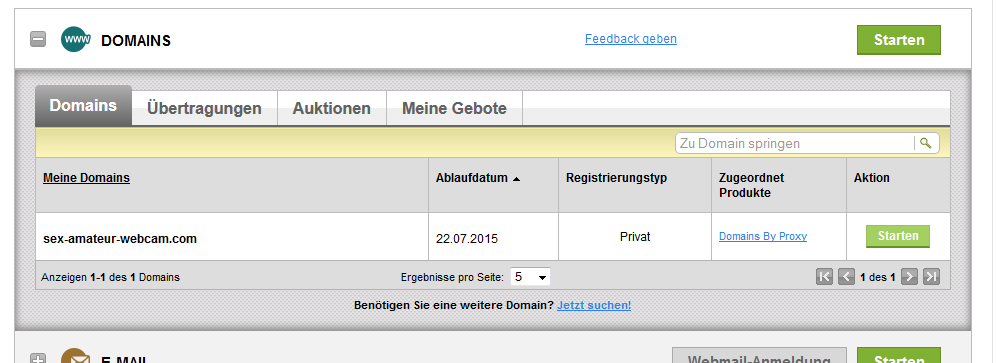
C-NAME Entry for GoDaddy
Log in and click on Domains (in our case, sex-amateur-webcam.com), then click on the button “Starten” (start).
Then, in the next screen, click on “DNS-Zonendatei” (DNS zone file) and configure the following settings.
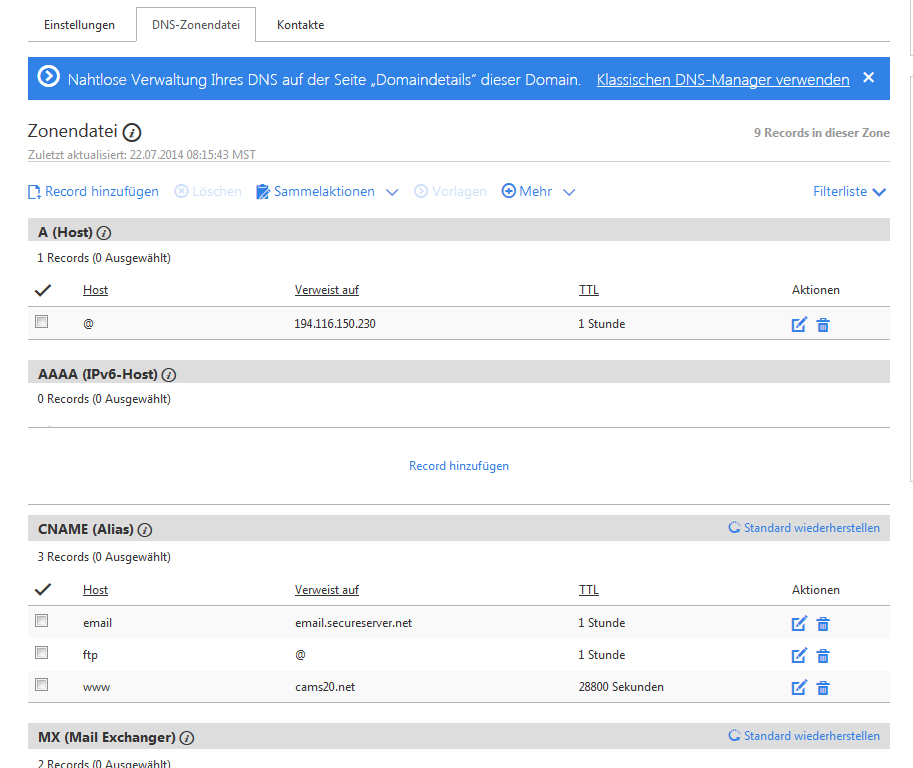
Please note that the entry has to be without a period at the end!
We can only give you a brief overview, but we assume that the process is similar for other domain hosters. Should you have specific questions, please contact your domain provider’s support!
Now let us return to the modular configuration in VX|Cash!
Google Analytics
After having mastered the challenge with the CNAME entry, we can now continue the configuration of our modular domain. The next step is to configure the Google Analytics codes. In this field you have to enter the Google code, in the following format: UA-XXXXXXXX-X

Categories
Here you can define your own categories, and then create your own niche pages with your special topic. Please note that when choosing sub-categories the number of displayed performer can be very small and possibly no 24/7 coverage is guaranteed.
Logo
Here you can add an optional text to your page (= header, just enter the chosen text here), or an image (= logo, please enter the exact image URL, for example http://www.ihredomain.com/picturename.gif. Maximum width 980 pixels, max. height 125 pixels).
As for design, we will later publish another tutorial focussing on this topic.
Age Verification System (AVS)
Here you can integrate age verification systems, if required. German webmasters with an .de domain are strongly advised to use an AVS which ensures a closed user group.
Preview Images
Here you can select how the images are displayed for the users before they log in with their user name:
Supersoft: all performers are thoroughly clothed 😉
Soft: you can only glimpse secondary sexual characteristics (e.g. “topless“)
Currency
Here you can select the currency displayed.
Payment Methods
Here you can select the payment methods displayed. By default all payment methods are displayed, but you have the option to select “Ausgewählte Bezahlarten” (selected payment methods only). With this option, payment methods with higher risks of cancellation are hidden.
Registration Method
Here you can select what the users get to see immediately after registering. Please be aware that the registration method may have a significant effect on the conversion rate, depending on the kind of traffic.
Favoring Certain Performers
The selected performers will be displayed on top of the performers overview of the modular kit – as long as they are online. The performer selected as “first” is also displayed as “top amateur” on the homepage of your kit! If you don’t want to favor any performer, simply leave this field empty.
Meta-Data
To achieve a better placement in the search engines, you can provide the relevant information for the meta tags here. If you don’t want to enter meta data, simply leave this field empty.
As far as SEO is concerned, there will be another tutorial with more information about this topic.
Your Own Content
Here you can integrate your own content (e.g. images, text etc.) via iframe. Please enter directly the URLs to your iframes (maximum size for the frames is 468x60px or 120x240px. You can, of course, also find matching banners at VX|CASH). If you don’t want to include your own content, simply leave these fields blank.
Create an HTML file with this content, eg. http://www.example.com/_iframe/iframe.html and add this URL in the field for “URL zum Content” (URL for the content). Finished! 🙂
Please note > when you redirect your top level domain via CNAME > of course you can’t expect to still be able to access iframes from this domain. Simply create a subdomain – e.g. iframe.superdomain.com. This is where you upload your iframes for your modular domain.
Colors
This is where you can choose different colors for your modular kit. Enter the RGB value directly, or simply use the color configurator.
As for design, we will later publish another tutorial focussing on this topic.
Crosselling
Here you can decide whether you want to promote our dating site Lustagenten.com on your live cam site via pop-under.
Of course you can also deactivate this option.